- Getting Started with Generative Artificial Intelligence
- Mastering Image Generation Techniques with Generative Models
- Generating Art with Neural Style Transfer
- Exploring Deep Dream and Neural Style Transfer
- A Guide to 3D Object Generation with Generative Models
- Text Generation with Generative Models
- Language Generation Models for Prompt Generation
- Chatbots with Generative AI Models
- Music Generation with Generative Models
- A Beginner’s Guide to Generative Design
- Video Generation with Generative Models
- Anime Generation with Generative Models
- Generative Adversarial Networks (GANs)
- Generative modeling using Variational AutoEncoders
- Reinforcement Learning for Generation
- Interactive Generative Systems
- Fashion Generation with Generative Models
- Story Generation with Generative Models
- Character Generation with Generative AI
- Generative Modeling for Simulation
- Data Augmentation Techniques with Generative Models
- Future Directions in Generative AI
Character Generation with Generative AI | Generative AI
Introduction
Generative Adversarial Networks (GANs), a potent artificial intelligence tool, are used in this tutorial to explore character generation. Anime characters and handwritten numbers alike can be created with realistic synthetic data thanks to GANs. To implement a GAN for character generation, the tutorial makes use of the TensorFlow, Python, and Keras libraries. Users can explore the creative potential of generative AI with its coverage of dataset preparation, network building, model compilation, and training.
Importance of character generation
Character creation is important for a variety of industries, including digital art, gaming, entertainment, and science. It makes virtual worlds more realistic, improves immersive experiences, and helps designers and artists explore new ideas. It also displays developments in machine learning and artificial intelligence, pushing the frontiers of generative modelling and creative expression.
Let’s dive into character generation with generative models
- GAN
Overview character generation using GAN
By using cutting-edge artificial intelligence techniques to produce lifelike character images, Generative Adversarial Networks (GANs) push the boundaries of creativity and find applications in digital art, entertainment, gaming, and science.
The Workflow:
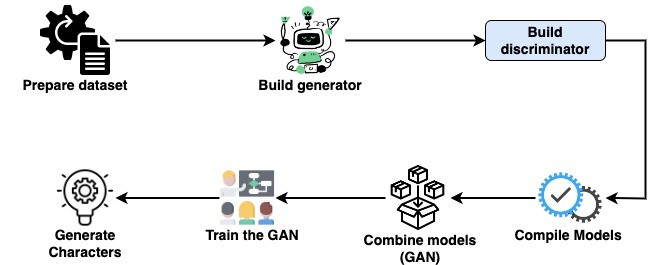
Implementation of character generation Using GAN
Let’s go through a simple code to understand things better:
Step 1: Install Dependencies
Ensure you have TensorFlow and Keras installed. You can install them using pip:
!pip install tensorflow kerasStep 2: Prepare Dataset
A character image dataset—a collection of handwritten numbers—must be publicly available or your own in order to train a GAN. One such dataset is MNIST.
from keras.datasets import mnist.
# Load MNIST dataset
(X_train, _), (_, _) = mnist.load_data()
# Normalize pixel values to the range [-1, 1]
X_train = (X_train.astype('float32') - 127.5) / 127.5
Output:
Downloading data from https://storage.googleapis.com/tensorflow/tf-keras-datasets/mnist.npz
11490434/11490434 [==============================] - 0s 0us/step
Step 3: Build the Generator
The generator creates false images by feeding it random noise. Convolutional layers are usually followed by up sampling layers in this structure.
from keras.models import Sequential
from keras.layers import Dense, Reshape, Flatten
from keras.layers import Conv2D, Conv2DTranspose
from keras.layers import LeakyReLU
defbuild_generator():
    model = Sequential()
    model.add(Dense(7*7*128, input_dim=100))
    model.add(LeakyReLU(alpha=0.2))
    model.add(Reshape((7, 7, 128)))
    model.add(Conv2DTranspose(128, (4,4), strides=(2,2), padding='same'))
    model.add(LeakyReLU(alpha=0.2))
    model.add(Conv2DTranspose(1, (4,4), strides=(2,2), padding='same', activation='tanh'))
    return model
Step 4: Build the Discriminator
The discriminator looks for differences between photos that are real and those that are not. Usually, downsampling layers come after convolutional layers.
defbuild_discriminator():
    model = Sequential()
    model.add(Conv2D(64, (3,3), strides=(2,2), padding='same', input_shape=(28, 28, 1)))
    model.add(LeakyReLU(alpha=0.2))
    model.add(Conv2D(128, (3,3), strides=(2,2), padding='same'))
    model.add(LeakyReLU(alpha=0.2))
    model.add(Flatten())
    model.add(Dense(1, activation='sigmoid'))
    return model
Step 5: Compile the Models
Compile both the generator and discriminator models with appropriate loss functions and optimizers.
from keras.optimizers import Adam
# Build and compile the discriminator
discriminator = build_discriminator()
discriminator.compile(loss='binary_crossentropy', optimizer=Adam(lr=0.0002, beta_1=0.5), metrics=['accuracy'])
# Build and compile the generator
generator = build_generator()
generator.compile(loss='binary_crossentropy', optimizer=Adam(lr=0.0002, beta_1=0.5))
Step 6: Combine the Models (GAN)
Create a GAN model with the generator and discriminator in it, and train the generator to trick the discriminator.
from keras.models import Model
from tensorflow.keras.layers import Input
# Disable training of discriminator during GAN training
discriminator.trainable = False
# Combined model (stacked generator and discriminator)
gan_input = Input(shape=(100,))
fake_image = generator(gan_input)
gan_output = discriminator(fake_image)
gan = Model(gan_input, gan_output)
# Compile GAN
gan.compile(loss='binary_crossentropy', optimizer=Adam(lr=0.0002, beta_1=0.5))
Step 7: Train the GAN
Train the GAN by alternating between training the discriminator and training the generator.
import numpy as np
deftrain_gan(epochs, batch_size, sample_interval):
    for epoch in range(epochs):
        # Select a random batch of real images
        idx = np.random.randint(0, X_train.shape[0], batch_size)
        real_images = X_train[idx]
        # Generate a batch of fake images
        noise = np.random.normal(0, 1, (batch_size, 100))
        fake_images = generator.predict(noise)
        # Train the discriminator
        d_loss_real = discriminator.train_on_batch(real_images, np.ones((batch_size, 1)))
        d_loss_fake = discriminator.train_on_batch(fake_images, np.zeros((batch_size, 1)))
        d_loss = 0.5 * np.add(d_loss_real, d_loss_fake)
        # Train the generator (via the GAN model)
        noise = np.random.normal(0, 1, (batch_size, 100))
        g_loss = gan.train_on_batch(noise, np.ones((batch_size, 1)))
        # Print progress
        if epoch % sample_interval == 0:
            print(f"Epoch {epoch}, D Loss: {d_loss[0]}, G Loss: {g_loss}")
Step 8: Generate Characters
Generate characters by sampling random noise and passing it through the generator.
import matplotlib.pyplot as plt
defgenerate_characters(rows, cols, figsize=(10, 10)):
    noise = np.random.normal(0, 1, (rows * cols, 100))
    generated_images = generator.predict(noise)
    # Rescale images 0 - 1
    generated_images = 0.5 * generated_images + 0.5
    plt.figure(figsize=figsize)
    for i in range(rows * cols):
        plt.subplot(rows, cols, i+1)
        plt.imshow(generated_images[i, :, :, 0], cmap='gray')
        plt.axis('off')
    plt.show()
Step 9: Train and Generate
Now, let's put it all together and train the GAN to generate characters.
epochs = 30000
batch_size = 128
sample_interval = 1000
train_gan(epochs, batch_size, sample_interval)
generate_characters(5, 5)
output
4/4 [==============================] - 2s 3ms/step
Epoch 0, D Loss: 0.7002500891685486, G Loss: 0.6891128420829773
4/4 [==============================] - 0s 2ms/step
===========================================
===========================================
1/1 [==============================] - 0s 195ms/step
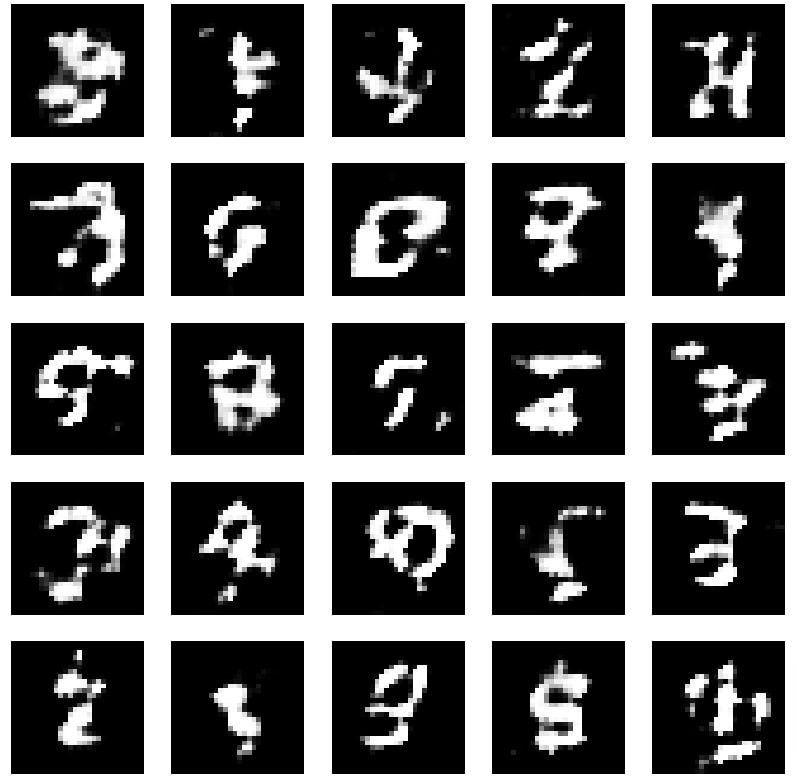
Conclusion
Generative Adversarial Networks (GANs), one type of generative AI technique, allow for the generation of realistic, varied character images. This tutorial offers insights into every step of the GAN training process, from setting up the dataset to putting the model into practice. Character generation has enormous potential for creative expression, entertainment, and technological advancement in the production of digital content as long as research into the field is conducted.