- Introduction to Computer Vision
- Image Preprocessing for Computer Vision
- Mathematical Analysis for Computer Vision
- A Complete Guide of Data Augmentation in Computer Vision
- Hands-on Image Classification in Computer Vision
- Face Recognition in Computer Vision with Implementation
- A Complete Guide to Object Detection with Implementation in Computer Vision
- A Comprehensive Guide to Image Segmentation in Computer Vision
- Pose Estimation in Computer Vision: Concepts & Implementation
- Optical Character Recognition (OCR) in Computer Vision: From Pixels to Text
- Image Generation with DCGANs in Computer Vision
- A Complete Guide to Image Restoration in Computer Vision
- 3D image generation in Computer Vision with implementation
A Complete Guide to Object Detection with Implementation in Computer Vision | Computer Vision
Object detection is a complex task in machine vision. It involves identifying and tracing objects from Pacific images or videos. Using complex deep learning architecture, analyze image data and localize objects. The output shows the name of the object and the bounding box. In this tutorial, we will describe basic object detection, some architecture for object detection, and implementation using the YOLO algorithm. So, let's dive deep into it.
What is Object Detection?
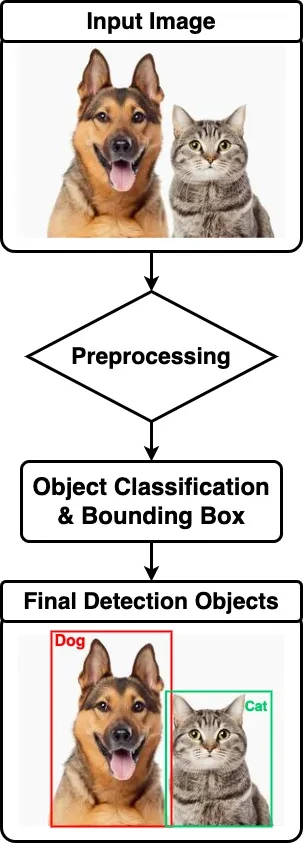
Object detection is a computer vision technique that finds and recognizes objects in images or videos. It not only identifies what objects are present but also pinpoints their location and size.
How Does Object Detection Image Processing Work?
Object detection combines image processing and deep learning to analyze visual data. It detects multiple objects in a single image and provides their exact positions using bounding boxes.
Why is Object Detection Important?
This technology is widely used in industries like:
Self-Driving Cars: Detect pedestrians, vehicles, and road signs to ensure safe driving.
Surveillance: Identifies suspicious activities and improves security monitoring.
Robotics: Helps robots recognize and interact with objects efficiently.
Modes and Types of Object Detection
Object detection uses two main approaches: traditional machine learning and deep learning.
- Traditional Machine Learning-Based Detection
Earlier methods relied on extracting features like color, edges, and textures from images. These features were fed into models to predict object locations. However, these methods struggled with complex scenes and required manual feature engineering, making them less flexible.
- Deep Learning-Based Detection
Modern object detection relies on Convolutional Neural Networks (CNNs), which automatically learn features from raw images. CNNs divide images into regions of interest (ROIs), classify objects, and refine locations. Deep learning enables higher accuracy, better adaptability, and improved detection of complex objects.
Why is Object Detection Important in Computer Vision?
Object detection helps machines see, understand, and interact with the visual world. It powers video surveillance, self-driving cars, robotics, image search, and AR.
Security - Detects threats and anomalies.
Autonomous Vehicles - Aids navigation and object recognition.
Retail - Improves inventory tracking and shopping experience.
Medical Imaging - Helps detect diseases for early treatment.
What is the Procedure for Detecting Objects?
Object detection identifies and locates objects in images. It uses two key techniques: image processing and deep learning.
- Image Processing
This method detects objects using edges, textures, and segmentation without needing labeled data. It's often used for simpler tasks and unsupervised learning.
- Deep Learning (CNNs)
Deep neural networks (CNNs) analyze labeled images to detect objects. They learn patterns, classify objects, and draw bounding boxes with confidence scores. Training on large datasets improves accuracy, making deep learning the dominant approach.
Object detection powers AI applications like autonomous vehicles, security, and medical imaging, revolutionizing industries with smart automation.
Object Detection Use Cases in Computer Vision
Object detection is transforming industries with AI-powered automation. Here are key applications:
- Autonomous Vehicles
Self-driving cars use object detection with cameras, lidar, and radar to identify pedestrians, vehicles, and road obstacles. It helps predict movements, ensuring safe and efficient navigation.
- Surveillance & Security
AI-powered real-time monitoring detects suspicious activity, intrusions, and threats. Used in government buildings, research labs, and financial institutions, it enhances safety and security.
- Medical Imaging
Object detection helps identify tumors, lesions, and abnormalities in medical scans. Early detection improves diagnosis, treatment, and patient outcomes.
- Sports Analytics
Tracking player movements and ball trajectory gives coaches real-time insights. Teams use AI-powered analysis to optimize performance and strategy.
Most Popular Object Detection Architectures
There are many deep learning approaches to object detection like R-CNN, Fast R-CNN, Faster R-CNN, YOLO, and SSD. These models apply CNNs to the tasks of object classification and localization within image data. R-CNN works on region proposal processing whereas Fast R-CNN works faster as it shares computation. To improve detection further, Faster R-CNN uses a Region Proposal Network (RPN). Real time detection is possible with YOLO (You Only Look Once) and SSD (Single Shot MultiBox Detector), which makes them suitable for automated cars, surveillance, and healthcare imaging.
How Does Object Detection Work?
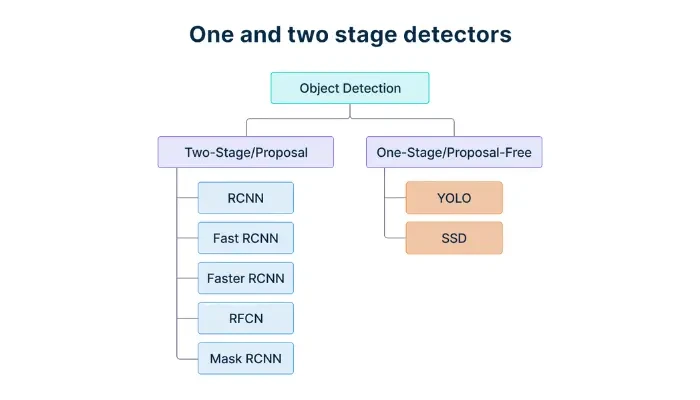
Object detection is categorized into two main approaches based on how objects are detected and localized:
- Two-Stage Object Detectors (Proposal-Based)
These models first generate region proposals and then classify objects. They are highly accurate but slower.
- Single-Stage Object Detectors (Proposal-Free)
These models directly predict object classes and locations in a single step, making them fast and ideal for real-time applications.
Two-stage object detectors
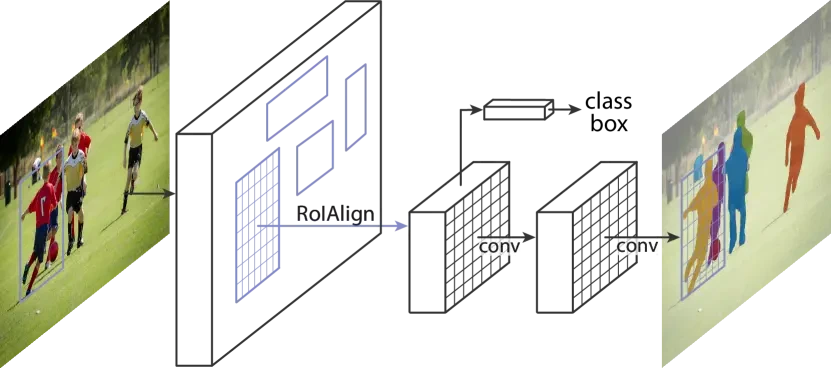
Two-stage object detectors first extract Regions of Interest (RoIs) and then classify and refine them for precise detection. Models like R-CNN, Fast R-CNN, and Faster R-CNN use a Region Proposal Network (RPN) to improve efficiency, while Mask R-CNN adds instance segmentation for pixel-level accuracy. These models prioritize accuracy over speed, making them ideal for medical imaging, security, and research applications.
- Mask R-CNN
Mask R-CNN is an object instance segmentation model that extends Faster R-CNN by adding a segmentation branch. Alongside classification and bounding box detection, it predicts pixel-wise masks for each object. This is achieved using a Fully Convolutional Network (FCN) applied to each Region of Interest (RoI). Mask R-CNN is widely used in medical imaging, autonomous vehicles, and robotics for precise object segmentation.
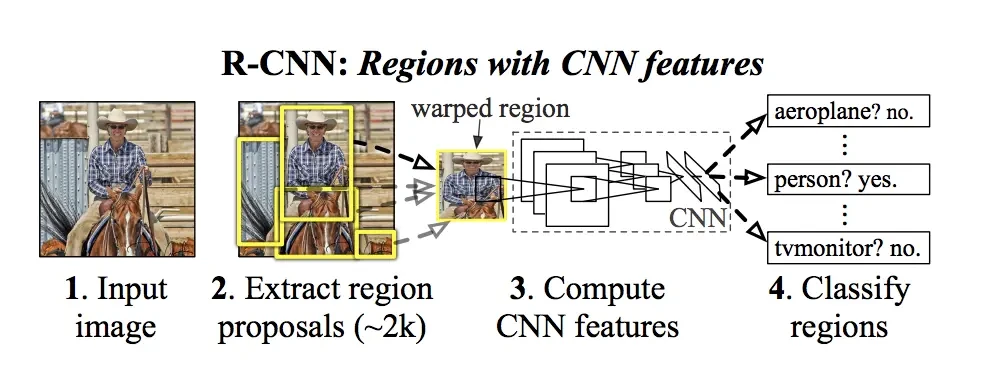
- R-CNN (Regions with CNN Features)
R-CNN is finding regions of the Pacific object in an image using a selective search. We warp all pixels in a close bounding box around the candidate region to the necessary size, regardless of its size or aspect ratio. It computes features for each proposal using a prominent CNN. approximately 2000 regions of the proposed architecture are computed CNN features.
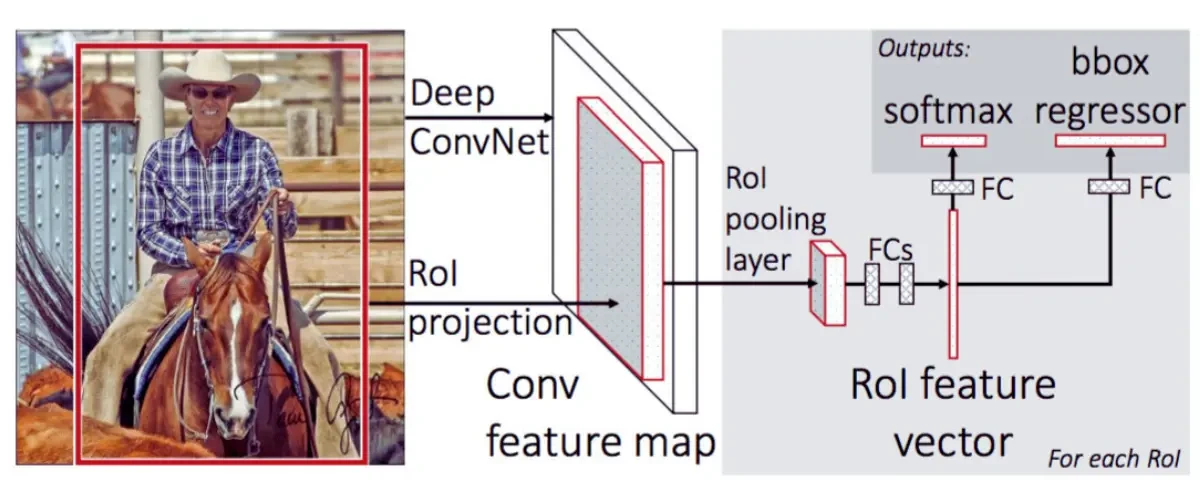
- Fast R-CNN
Fast R-CNN is the successor algorithm of R-CNN; it's faster than R-CNN. It involves several changes to make it faster and more accurate form R-CNN. The entire image is run through a CNN to create a convolutional feature map. Using the convolutional feature map, regions of interest are found, and an ROI pooling layer is added to resize them all to the same size. Each suggestion is then forwarded to a layer that is fully connected.
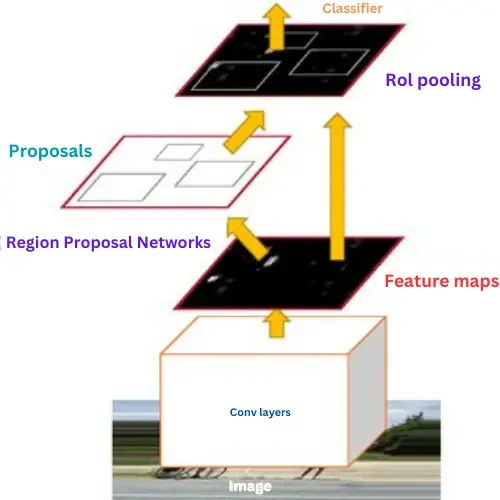
- Faster R-CNN
In the previous two architectures, R-CNN and fast R-CNN use selective search algorithms. Selective search is a slow and time-consuming process. Faster R-CNN is the fact that it uses the Region Proposal Network (RPN) for generating regions of interest. Provide a bounding box on a Pacific object from the image. Improved efficiency and accuracy with less time consumption than R-CNN and fast R-CNN. Faster R-CNN is the best architecture for region-based object detection.
Single-Stage Object Detectors
Single-stage detectors skip RoI extraction and directly classify and localize objects in one pass, making them fast and efficient. Examples include YOLO (YOLOv2, YOLOv3, YOLOv4, YOLOv5, YOLOv6, YOLOv7, YOLOv8, YOLOv9, YOLOv10, YOLOv11), CornerNet, and CenterNet, widely used in real-time applications like autonomous driving, surveillance, and robotics.
- YOLO (You Only Look Once)
YOLO (You Only Look Once) revolutionized object detection, according to Joseph Redmon, Santosh Divvala, Ross Girshick, and Ali Farhadi's paper. introducing a single-stage, real-time detection architecture. YOLO divides the input image into a grid and predicts bounding boxes and class probabilities for each grid cell simultaneously. A single neural network directly predicts bounding boxes and class probabilities from full images. This means it only needs one pass through the network to make predictions.
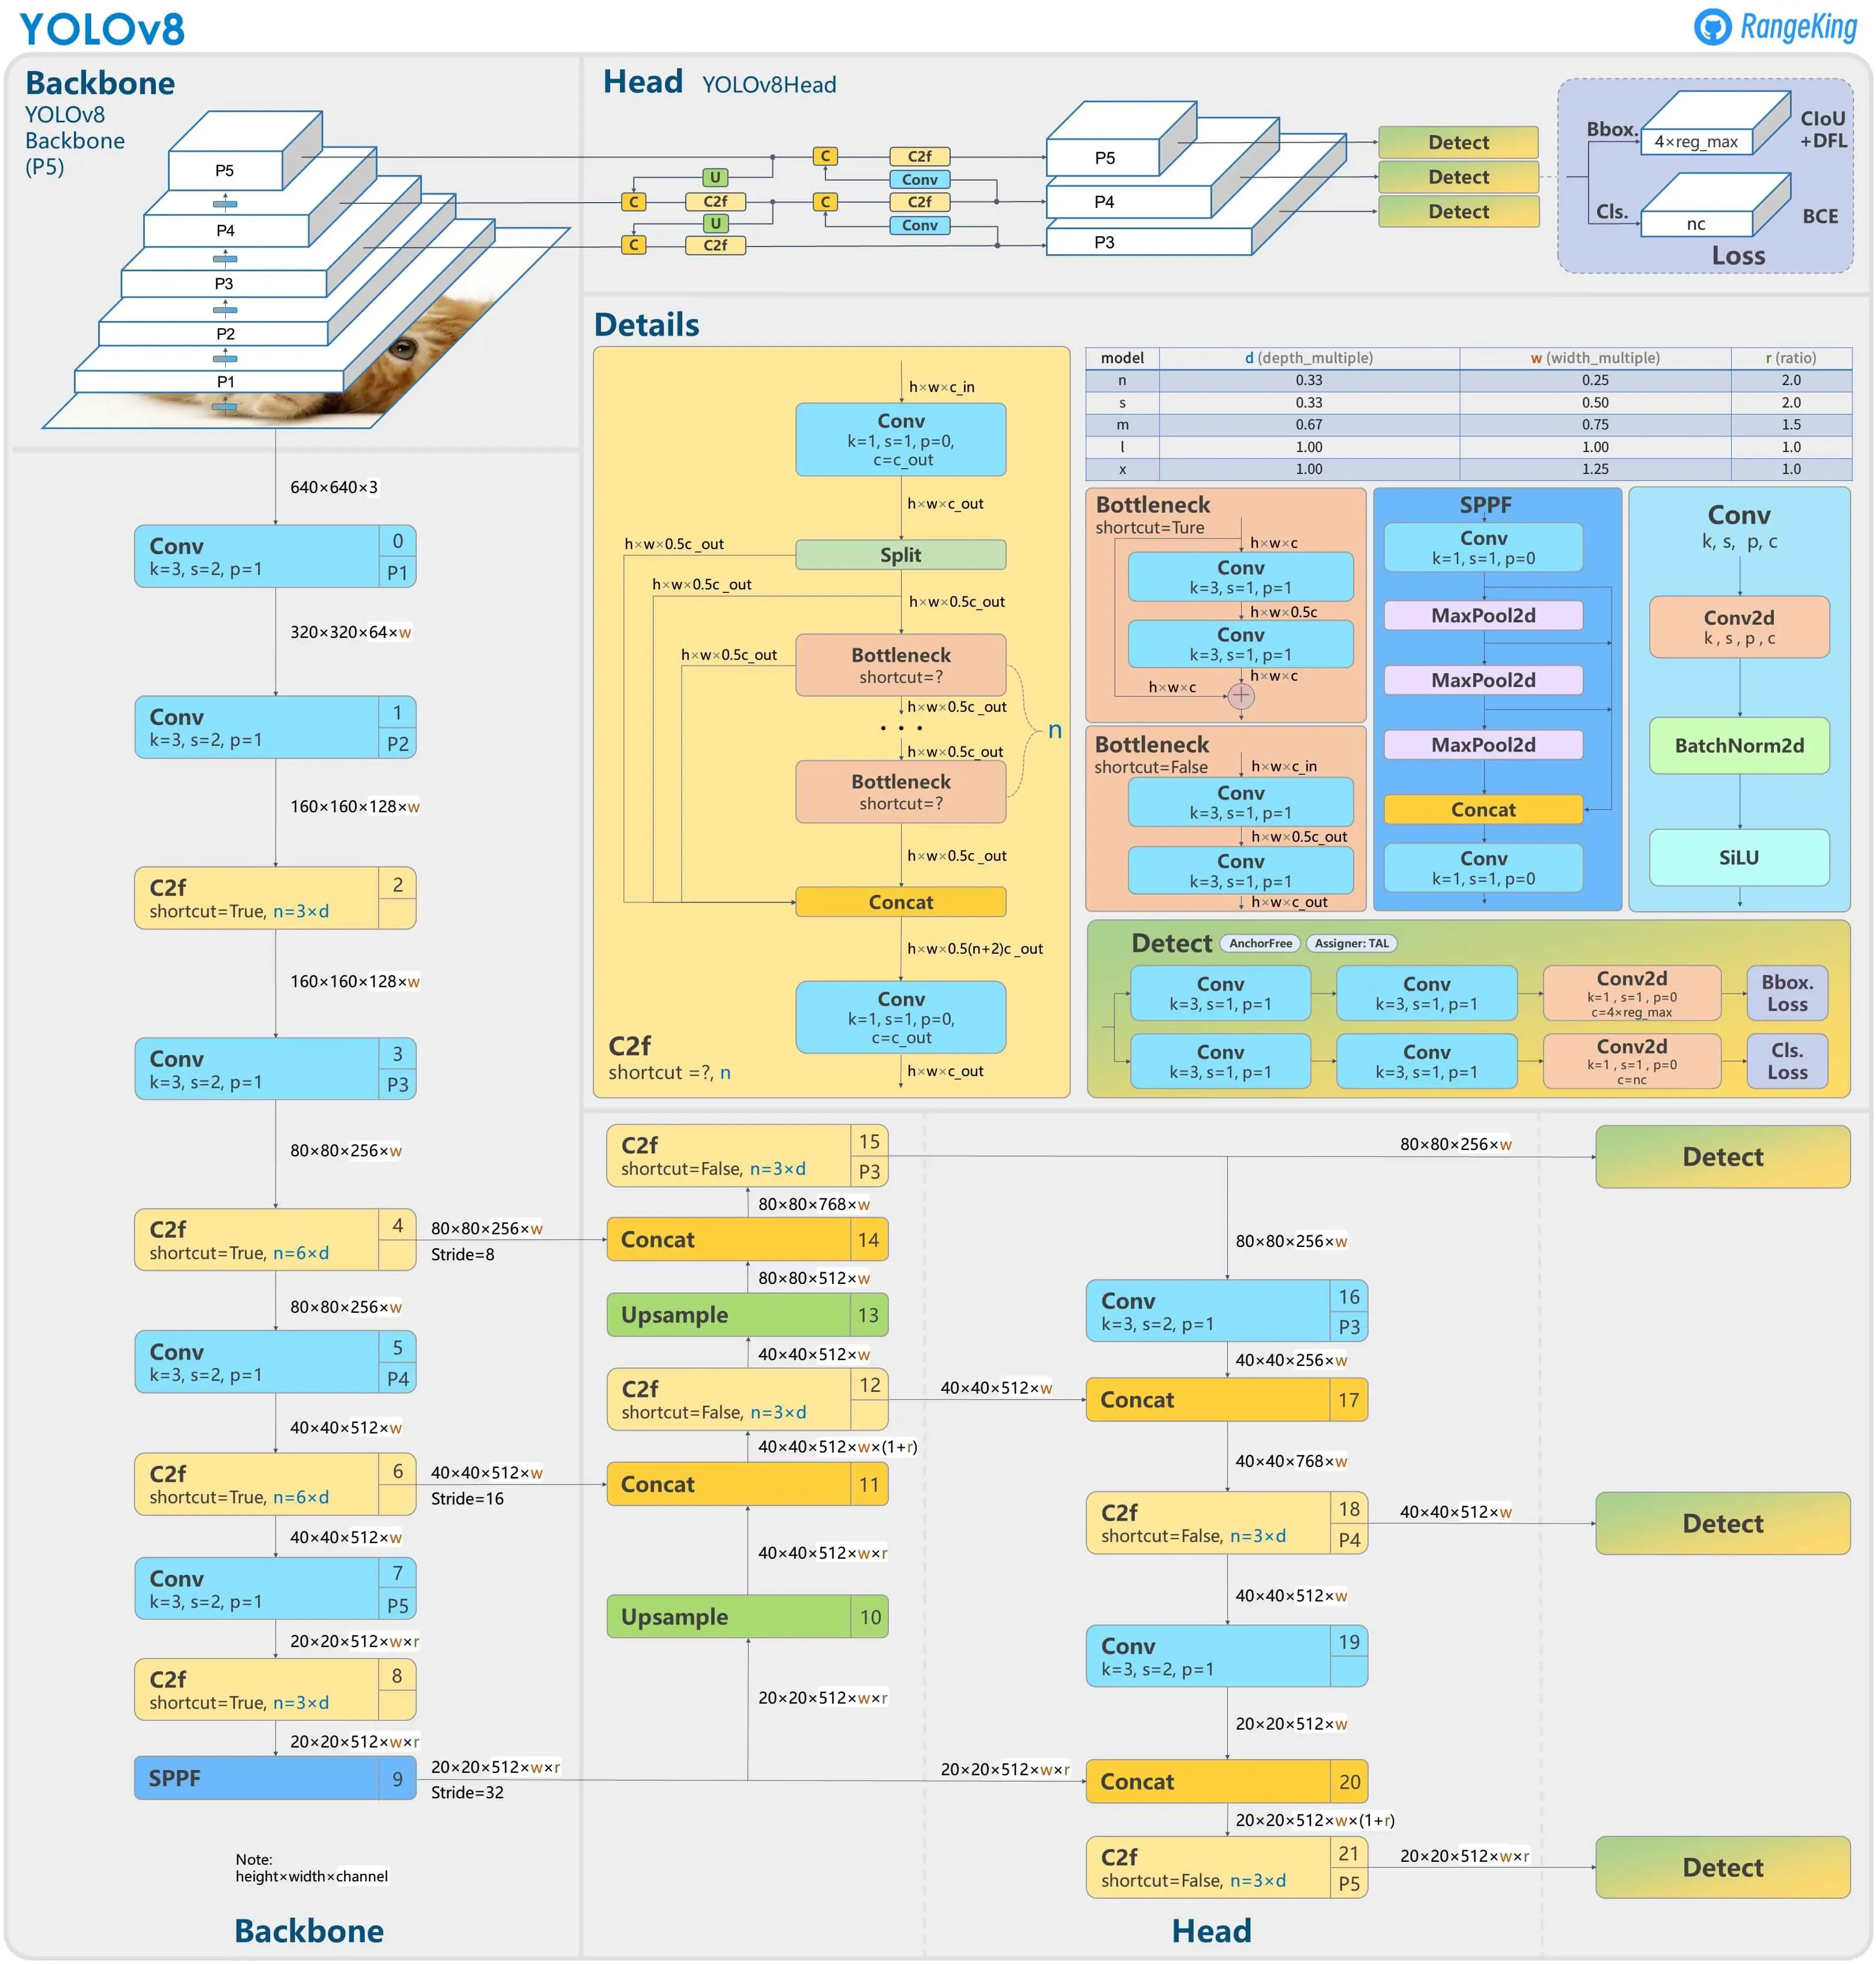
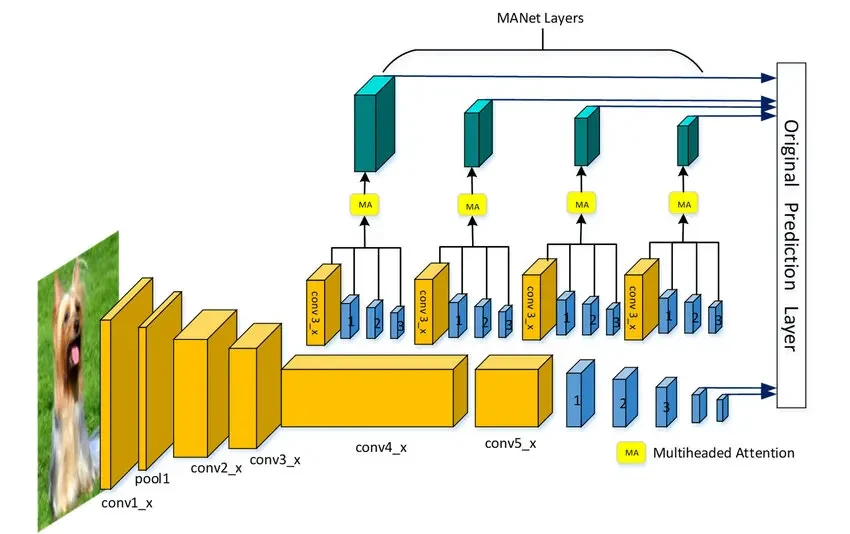
YOLOv8 Overview
The image above illustrates the YOLOv8 architecture, highlighting its Backbone, Head, and Detection layers. The Backbone extracts features using Convolutional (Conv) layers and C2f modules, while the Head processes and refines object detections. YOLOv8 improves accuracy and efficiency, making it ideal for real-time AI applications in autonomous vehicles, surveillance, and robotics.
In 2016, Wei Liu, Dragomir Anguelov, Dumitru Erhan, Christian Szegedy, Scott Reed, Cheng-Yang Fu, and Alexander C. Berg published a paper titled SSD: Single Shot MultiBox Detector. It's also a single-stage object detection architecture. It performs best (mean average precision) at 59 farms per second. The bounding box regression technique is multiple boxes.
Implementing Object Detection with Computer Vision
Object detection with deep learning follows a structured process.
Here are the key steps:
Gathering a Dataset
Collect images containing the objects you want to detect. Use public datasets like COCO, ImageNet, or Pascal VOC or create your own dataset. Ensure diversity in angles, sizes, and lighting conditions for better model performance.
- Annotating the Dataset
Label objects in images using tools like LabelImg or RectLabel. This involves drawing bounding boxes around objects and assigning labels, which is crucial for training accuracy.
- Preprocessing the Dataset
Resize images, normalize pixel values, and apply data augmentation (rotation, flipping, zooming) to prevent overfitting and improve model generalization.
- Training the Deep Learning Model
Use frameworks like TensorFlow, PyTorch, or Keras to train the model. The training process adjusts model weights using backpropagation to minimize prediction errors. A powerful GPU speeds up training.
- Evaluating the Model
Test the model on unseen images and measure accuracy and precision. High accuracy ensures correct identification, while precision ensures correct detections without false positives.
- Using the Model for Object Detection
Deploy the trained model for real-time object detection using algorithms like YOLO, SSD, or Faster R-CNN, depending on the application's speed and accuracy requirements.
Implementing Object Detection Code Using Faster R-CNN Architecture.
This project implements object detection using Faster R-CNN in computer vision. It loads a pre-trained Faster R-CNN with ResNet-50 FPN, applies it to real-world images, and visualizes the results with bounding boxes and class labels. The project also compares inference time on CPU vs. GPU to highlight performance differences.
Code Breakdown & Explanation
Step 1: Import Necessary Libraries
We import essential libraries for image processing and object detection. Torch and torchvision load Faster R-CNN, PIL processes images, OpenCV draws bounding boxes, Matplotlib displays images, and NumPy and os handle arrays and file paths.
# import necessary libraries
from PIL import Image
import matplotlib.pyplot as plt
import torch
import torchvision.transforms as T
import torchvision
import torch
import numpy as np
import cv2
import os
Step 2: Load Pre-Trained Faster R-CNN Model
We load Faster R-CNN with ResNet-50 FPN, which is pre-trained on COCO dataset. This model detects 80 object categories, including people, vehicles, and household items.
model= torchvision.models.detection.fasterrcnn_resnet50_fpn(pretrained=True)
model.eval()
Step 3: Define COCO Class Labels
The COCO dataset contains 80 object categories, and we store them in a list to map class IDs to actual names.
COCO_INSTANCE_CATEGORY_NAMES = [
'__background__', 'person', 'bicycle', 'car', 'motorcycle', 'airplane', 'bus',
'train', 'truck', 'boat', 'traffic light', 'fire hydrant', 'N/A', 'stop sign',
'parking meter', 'bench', 'bird', 'cat', 'dog', 'horse', 'sheep', 'cow',
'elephant', 'bear', 'zebra', 'giraffe', 'N/A', 'backpack', 'umbrella', 'N/A', 'N/A',
'handbag', 'tie', 'suitcase', 'frisbee', 'skis', 'snowboard', 'sports ball',
'kite', 'baseball bat', 'baseball glove', 'skateboard', 'surfboard', 'tennis racket',
'bottle', 'N/A', 'wine glass', 'cup', 'fork', 'knife', 'spoon', 'bowl',
'banana', 'apple', 'sandwich', 'orange', 'broccoli', 'carrot', 'hot dog', 'pizza',
'donut', 'cake', 'chair', 'couch', 'potted plant', 'bed', 'N/A', 'dining table',
'N/A', 'N/A', 'toilet', 'N/A', 'tv', 'laptop', 'mouse', 'remote', 'keyboard', 'cell phone',
'microwave', 'oven', 'toaster', 'sink', 'refrigerator', 'N/A', 'book',
'clock', 'vase', 'scissors', 'teddy bear', 'hair drier', 'toothbrush'
]
Step 4: Define Object Detection Function
This function:
Runs inference on an image.
Draws bounding boxes around detected objects.
Displays the image with labels and boxes.
def object_detection_api(img_path, threshold=0.5, rect_th=3, text_size=3, text_th=3):
"""
object_detection_api
parameters:
- img_path - path of the input image
- threshold - threshold value for prediction score
- rect_th - thickness of bounding box
- text_size - size of the class label text
- text_th - thichness of the text
method:
- prediction is obtained from get_prediction method
- for each prediction, bounding box is drawn and text is written
with opencv
- the final image is displayed
"""
boxes, pred_cls = get_prediction(img_path, threshold)
img = cv2.imread(img_path)
img = cv2.cvtColor(img, cv2.COLOR_BGR2RGB)
for i in range(len(boxes)):
# Convert box coordinates to integers
boxes[i][0] = tuple(map(int, boxes[i][0])) # Convert top-left corner to integers
boxes[i][1] = tuple(map(int, boxes[i][1])) # Convert bottom-right corner to integers
cv2.rectangle(img, boxes[i][0], boxes[i][1],color=(0, 255, 0), thickness=rect_th)
cv2.putText(img,pred_cls[i], boxes[i][0], cv2.FONT_HERSHEY_SIMPLEX, text_size, (0,255,0),thickness=text_th)
plt.figure(figsize=(20,30))
plt.imshow(img)
plt.xticks([])
plt.yticks([])
plt.show()
Step 5: Download Images for Testing
We download four sample images to test object detection.
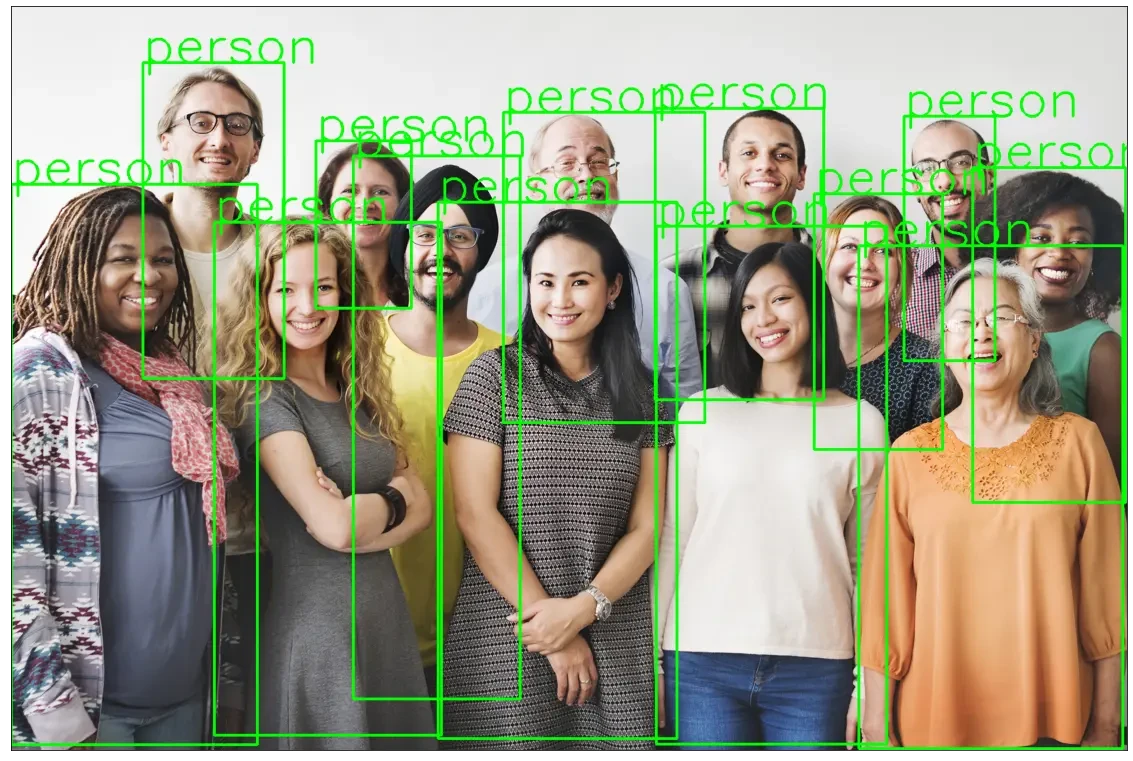
!wget https://www.wsha.org/wp-content/uploads/banner-diverse-group-of-people-2.jpg -O people.jpg
object_detection_api('./people.jpg', threshold=0.8)
Output 1:
https://www.wsha.org/wp-content/uploads/banner-diverse-group-of-people-2.jpg
Resolving www.wsha.org (www.wsha.org)... 141.193.213.10, 141.193.213.11
Connecting to www.wsha.org (www.wsha.org)|141.193.213.10|:443... connected.
HTTP request sent, awaiting response... 200 OK
Length: 1718649 (1.6M) [image/jpeg]
Saving to: 'people.jpg'
people.jpg 100%[===================>] 1.64M --.-KB/s in 0.03s
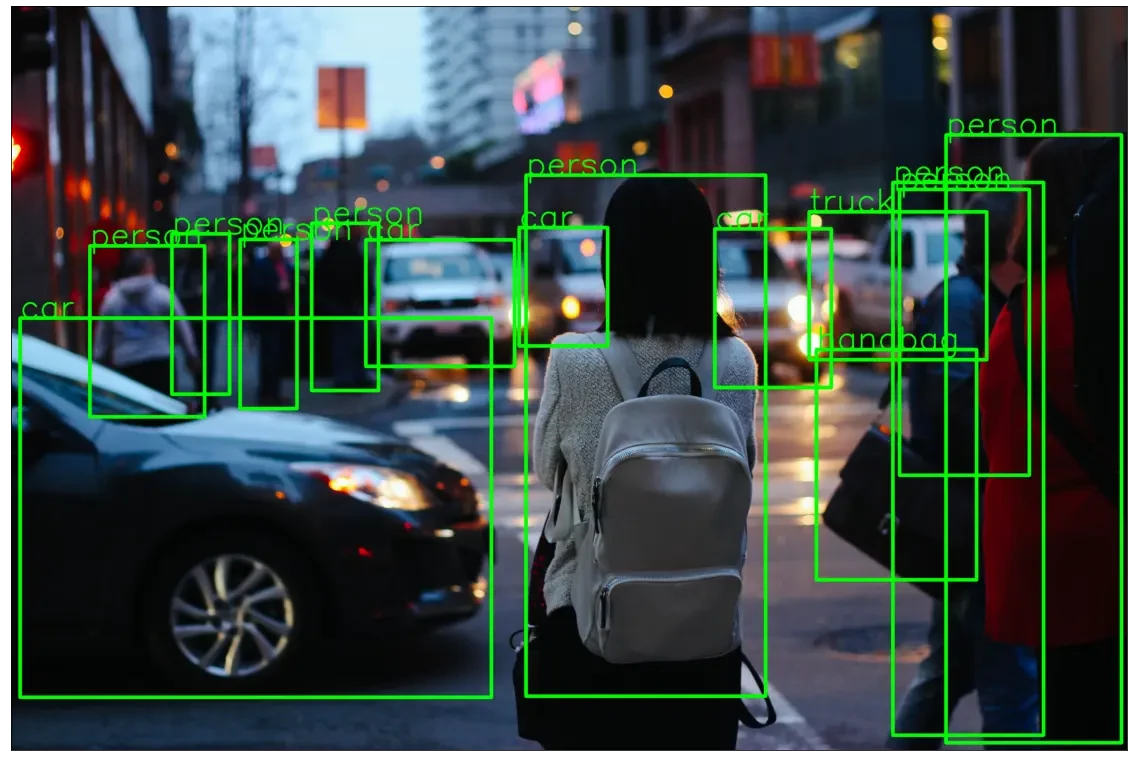
!wget https://images.unsplash.com/photo-1458169495136-854e4c39548a -O traffic_scene2.jpg
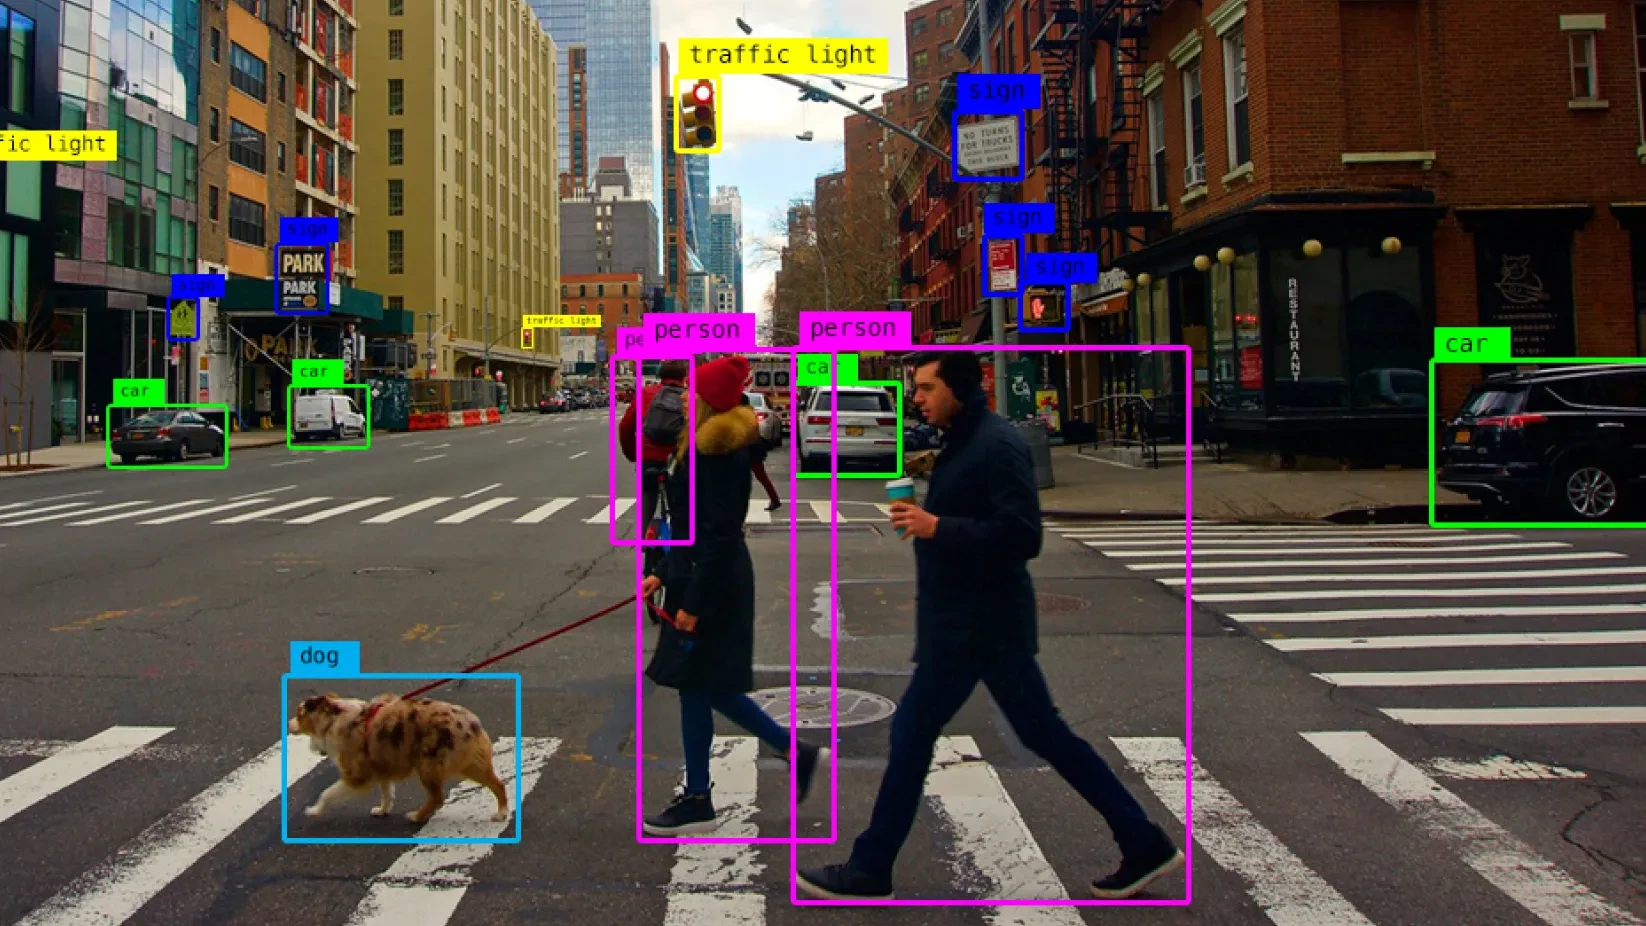
object_detection_api('./traffic_scene2.jpg', rect_th=15, text_th=7, text_size=5, threshold=0.8)
Output 2:
https://images.unsplash.com/photo-1458169495136-854e4c39548a
Resolving images.unsplash.com (images.unsplash.com)... 151.101.2.208, 151.101.66.208, 151.101.130.208, ...
Connecting to images.unsplash.com (images.unsplash.com)|151.101.2.208|:443... connected.
HTTP request sent, awaiting response... 200 OK
Length: 1197647 (1.1M) [image/jpeg]
Saving to: 'traffic_scene2.jpg'
traffic_scene2.jpg 100%[===================>] 1.14M --.-KB/s in 0.04s
Step 6: Compare Inference Time (CPU vs GPU)
This function measures how long inference takes on CPU vs. GPU.
GPU is faster but requires CUDA-enabled hardware.
CPU is slower but works on all machines.
import time
def check_inference_time(image_path, gpu=False):
model = torchvision.models.detection.fasterrcnn_resnet50_fpn(pretrained=True)
model.eval()
img = Image.open(image_path)
transform = T.Compose([T.ToTensor()])
img = transform(img)
if gpu:
model.cuda()
img = img.cuda()
else:
model.cpu()
img = img.cpu()
start_time = time.time()
pred = model([img])
end_time = time.time()
return end_time-start_time
Step 7: Run Inference on All Images & Compare CPU vs. GPU Performance
This loops through all downloaded images and calculates average inference time on CPU vs GPU.
img_paths = [path for path in os.listdir(".") if path.split(".")[-1].lower() in ["jpeg", "jpg", "png"] ]
gpu_time = sum([check_inference_time(img_path, gpu=True) for img_path in img_paths])/len(img_paths)
cpu_time = sum([check_inference_time(img_path, gpu=False) for img_path in img_paths])/len(img_paths)
print('\n\nAverage Time take by the model with GPU = {}s\nAverage Time take by the model with CPU = {}s'.format(gpu_time, cpu_time))
Output 3:
Average Time take by the model with GPU = 0.4402180194854736s
Average Time take by the model with CPU = 7.066267490386963s
In this tutorial, Object detection is a key computer vision technology that enables machines to identify and locate objects in images and videos. In this guide, we explored deep learning models like YOLO, SSD, and Faster R-CNN, their real-world applications, and a step-by-step Faster R-CNN implementation. We also compared CPU vs. GPU inference time to highlight performance differences. Object detection is widely used in self-driving cars, security, healthcare, and robotics, making AI more intelligent and efficient. With advancements in deep learning, models like DETR and YOLOv8 continue to enhance accuracy and speed, shaping the future of AI-powered automation.
If you're interested in working on computer vision and advanced AI projects, click here to explore more details.